As soon as the gooseberries are planted: with seedlings dug out of the nursery, or purchased in a package, with rooted cuttings or adult bushes. In most cases, the landing technology remains classic.
Content
Where will the gooseberry be in place
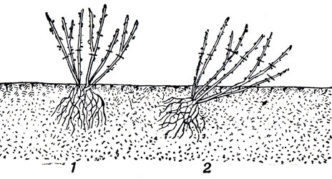
Gooseberries thrive on slightly acidic loose soils. For example, in sandy loam soil, the bush develops harmoniously - the root system and the crown are balanced. On heavy loam, it is difficult for the roots to break down; nutrition occurs due to the surface roots. In this case, practice an inclined landing at an angle of 450, thanks to which additional roots are formed on the shoots, sprinkled with earth - the support and nutrition of the bush.
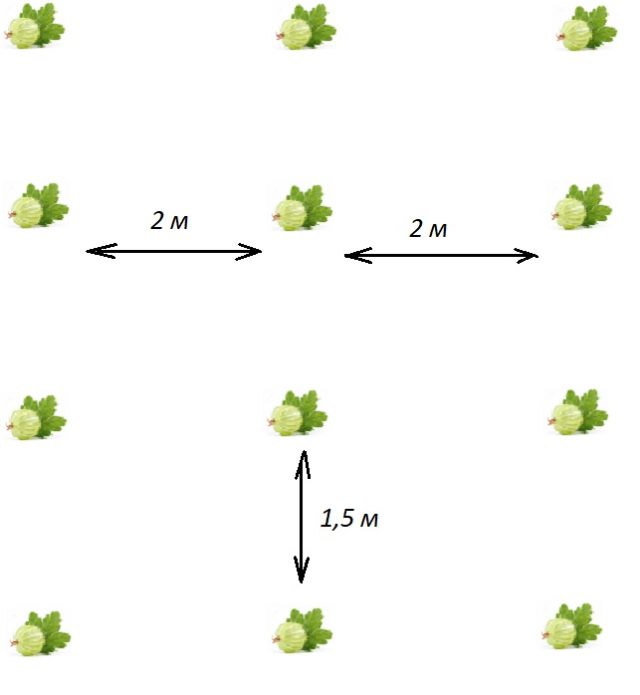
In the south, a sunny landing site is chosen, but at the same time protected from scorching rays. An openwork shade from decorative or fruit trees growing at some distance (about 2 m) will become a wonderful translucent screen. And trees will also protect perfectly from the strong and cold spring wind. If the aisles in the garden are wide enough, this will be the ideal place for gooseberry planting. Starting from the Middle Lane and further in the direction of the north, the lightest places are chosen for the gooseberries. Gooseberries are also planted along the walls of the house, the fence, along the border, retreating from the object 1.5 m, so that it is convenient to harvest and maintain good neighborly relations.
In terms of water, the gooseberry loves the middle ground, although it can withstand some discomfort in the form of "moderate" drought. But stagnation of water is categorically contraindicated for him, so it cannot be planted in temporarily flooded lowlands or where rainwater stagnates. The groundwater level should not exceed 1.5 m. If the planting site is suitable in terms of lighting, but after rains it remains damp for a long time, it (the bed) can be raised. To do this, a sand or gravel pillow 15–20 cm thick is arranged at the bottom of the pit, a nutritious substrate is poured on top and the gooseberries are planted in the usual manner.
The predecessors are good and bad
It is unacceptable to plant gooseberries after currants and raspberries, which are morphologically related to it, for three reasons:
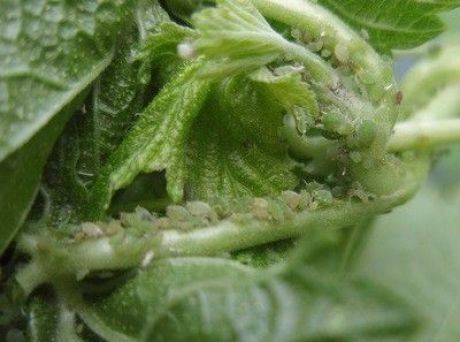
- Crops have common pests (gray bud weevil, red currant yellow sawfly, spider and bud mites, currant and gooseberry fireflies, aphids).
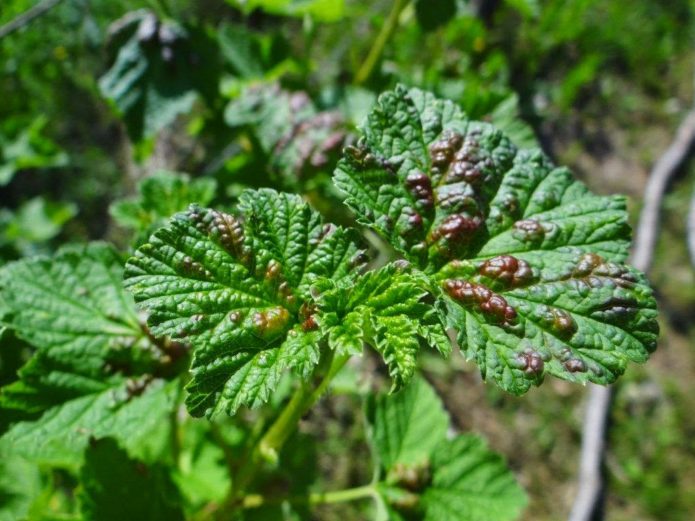
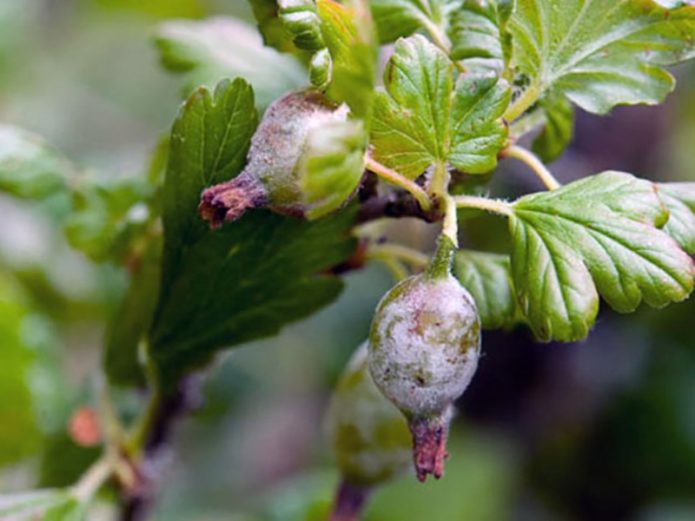
- They suffer from similar diseases - powdery mildew, goblet rust, septoria, chlorosis, mosaic.
- Because the soil in this place is a priori depleted.
But a vegetable patch after legumes, root crops (potatoes, beets), green manure, strawberries will be just right.
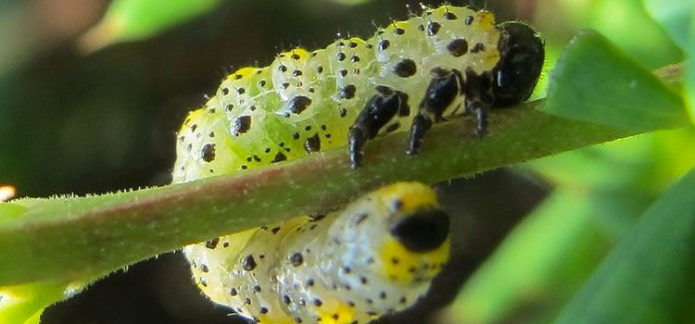
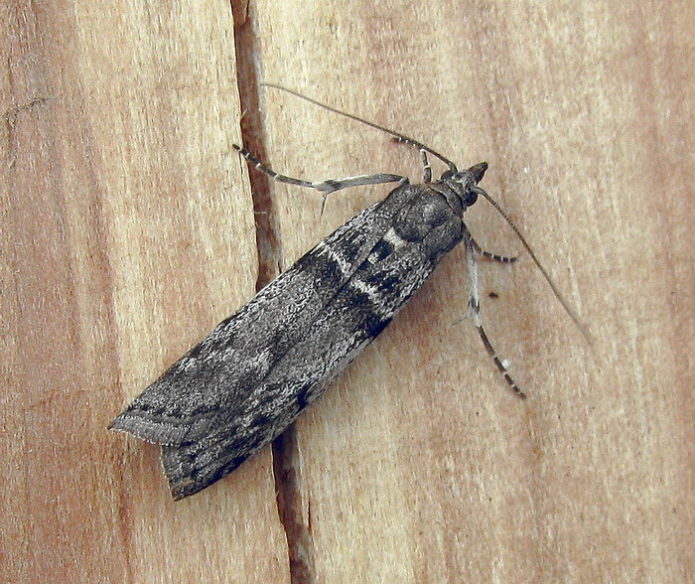
Photo gallery: gooseberry pests and diseases
-
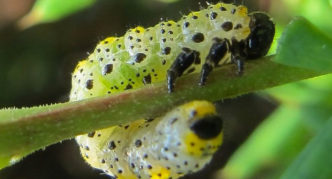
- The sawfly caterpillar is a glutton that leaves behind bare branches
-
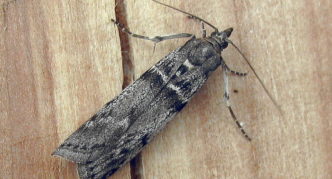
- A butterfly in noble colors, but let it fly around the garden
-
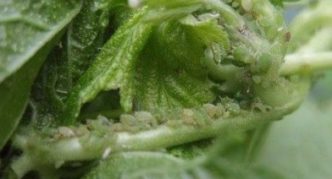
- Aphids are an omnipresent, unhurried and unpretentious evil
-

- Goblet rust
-
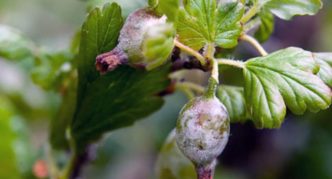
- Preventive measures against powdery mildew - regular inspection of bushes
Pit preparation
Before planting, you must clear at least 1 m2 land under a bush from creeping weeds (bindweed, wheatgrass), this must be done for several reasons:
- During weeding, the tough rhizomes of the weeds pull along and cut off the thin delicate gooseberry roots growing close to the surface of the earth.
- All subsequent weeding will take a minimum of time.
- So that the top dressing is not "eaten up" by weeds, but reaches its destination.
- To avoid painful scratches (creeping roots are inconvenient to pick by hand, and it is problematic to avoid injury under thorny shoots).
The landing pit should be prepared in advance. Opinions differ on this issue - some advise to do it in 7-10 days, others - in 3-4 weeks, but the key word remains “in advance”. It is necessary to allow time for the substrate to settle naturally so that the seedling does not deepen excessively after planting, watering, mechanical compaction of the earth. If the planting of gooseberries is scheduled for spring, a hole is dug in the fall and filled with nutrient substrate to the brim.
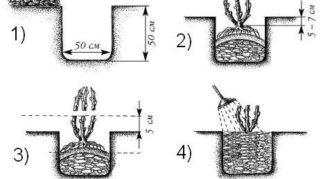
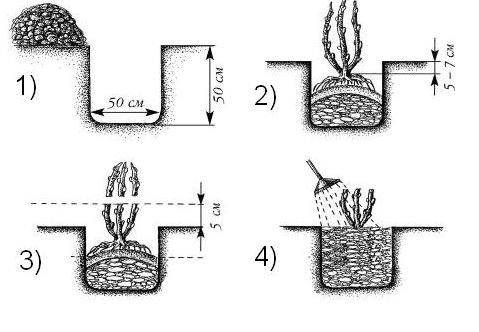
The depth and diameter of the pit, respectively, are 50 x 50 cm. (Why exactly this size? Because young plants, most of the suction roots responsible for nutrition will be located at a depth of about 25 cm, and in the fruiting plant they will penetrate into the depth of 40-60 cm). The poorer the land, the larger the pit should be (for example, 70 x 70).
The removed top layer of earth is mixed with organic matter and fertilizers. For one pit you will need:
- 8-10 kg of humus or rotted manure;
- 50 g of double superphosphate for any soil or 100 g of superphosphate for sandy loam and podzolic soil;
- 40 g potassium or 1.5 tbsp. wood ash.
Photo gallery: planting summary
-
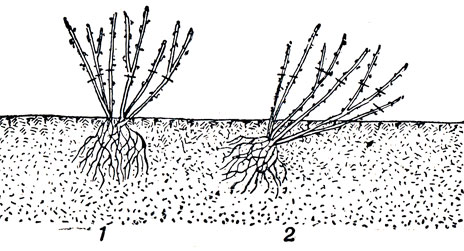
- Plant vertically on loose soil, obliquely on loam
-
- About landing in four patterns
-
- Pivotal roots are an anchor, overgrown roots - "feed" the bush, take care of them

Seedling preparation
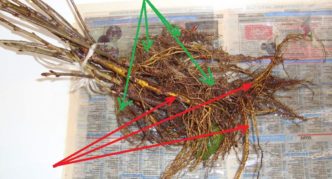
For planting, plants are used no older than two years - the older the plant, the harder and longer it takes root. A quality gooseberry seedling has:
- developed root system - 3 skeletal roots (thick, weakly bending) at least 15 cm long and an impressive bundle of fibrous thin roots;
- light color on the root cut, brown and black colors mean that the root is dead;
- 1–2 shoots 30–40 cm long and at least 0.5 cm thick;
- wet kidneys - for this one kidney is broken off and kneaded with fingers.
A seedling with an open root system is carefully examined and torn, flattened fragments are removed, which will primarily be susceptible to decay and fungal infections. The shoots should have an even color without dark spots, and if leaves have already appeared, they should have an even color (a whitish bloom may indicate a powdery mildew attack).
On the eve of planting, a seedling with an open root system is soaked in a growth stimulant solution (sodium humate, Heteroauxin, Kornevin, Zircon, Ribav extra) prepared according to the instructions. Before lowering the seedling into the hole, you can dip it with its roots in a clay mash, diluted to a creamy consistency. A clay layer, even a thin one, will additionally protect the roots from drying out.
Landing scheme
The choice of a specific planting scheme is influenced by the area of the cultivated area and the diameter of the adult bush. For example, the Ural Emerald variety, Hinnonmaen Punainen have a slightly spreading crown. And the Black Negus seems to be a real giant in comparison with other varieties, and the crown spreads out in a diameter of 2 m or more.
Sparse
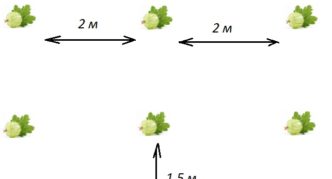
It is produced according to the scheme 1.5 x 2 m. The first number is the distance in the row, the second is the width of the row spacing. At first glance, the area with young seedlings will seem empty, but in 4-5 years the crowns will spread out, merge and the rows will be solid green lines (very beautiful, by the way).
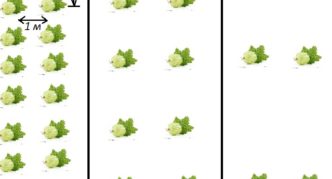
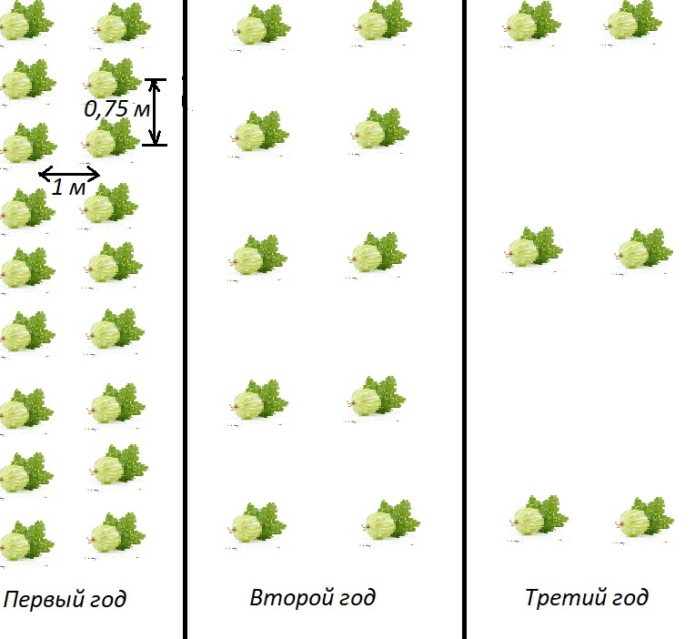
Combined
The essence of this scheme is reduced to planting plants, followed by two thinning. Initially, gooseberries are placed on the garden bed in 75 cm increments, leaving 1 m of free space between the rows. When the crowns begin to close, the plantings are thinned out through one bush. After a year, thinning is repeated. The dug out bushes are planted in a new place, sold, shared with friends.
In aisles
The row spacing of the orchard is on average about 4 m, which makes it possible to plant gooseberries on this strip. After closing the crowns of trees, the bushes are transplanted.
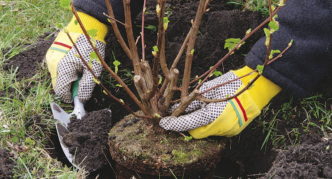
To transplant an adult bush, it is dug in a circle at a distance of about 30 cm from the central shoot, chopping off thick roots. With special reverence, one should treat the fibrous overgrowing roots. The bush is taken out with a lump of earth and transferred on matting, polyethylene to a new place.
Lack of space can lead to an original design solution - a single planting of gooseberries. In the "wild", the crowns of some varieties are scattered up to 2 m in diameter - such a bush will be a great decoration for a garden or grass lawn.
Photo gallery: gooseberry planting schemes
-

- Gooseberries in the aisles of fruit trees

-
- Change in the appearance of combined landings in 3 years
-
- Sparse fit
Step-by-step instructions for planting gooseberries
Actions are divided into 2 stages - performed in advance and directly landing.
Stage one:
- If several bushes are planted, the site is first marked out. Stakes are driven in along the edges of the site, a cord is pulled between them and pegs-beacons for bushes are driven along it.
- Digging a hole.
- The top layer of earth to the left, the bottom layer is spread between rows or used in compost heaps. If there is a shortage of mulching material, the lower ground can be used.
- Fertilizers and manure are mixed with the upper earth with a shovel on the ground or in a bowl or in a hole.
- The pit is filled with a prepared nutrient substrate for 2-3 times.
- Pour half a bucket of water.
Stage two (after 10 days or a month, depending on when the pit was prepared):
- The soil enriched with fertilizers in the pit is raked into a mound (the seedling will be located at the top of the hill and after watering and compaction of the earth, it will not fall through).
- Lightly sprinkle the nutrient mixture with soil without fertilizer so that the roots do not burn.
- If the soil is dry, the contents of the pit are moistened with water. It is moistened, and not poured into a swamp.
- If a standard gooseberry is planted, a peg-support is driven into the pit; stem attached to it will not skew.
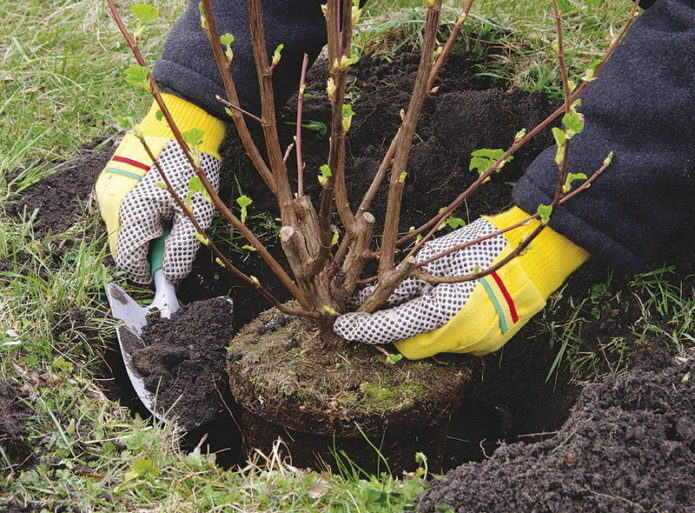
- The seedling is lowered into the hole, the root collar is kept below ground level by 5–7 cm. (At deeper depths, for example, by 15–20 cm, if new roots do not have time to grow on the shoots, the plant usually dies for 1–2 years).
- The roots are straightened by hand along the slopes of the mound in the direction of their growth - it is useless for them to bend up.
- Holding the seedling with one hand, pour the substrate in portions with the other hand. During the procedure, the seedling is slightly shaken, or rather, twitched so that the lumps of earth wake up into the voids between the roots. Uncomfortable to operate with one hand? Call an assistant.
- The earth is compacted with a foot along the radius, making sure that the seedling does not warp.
- A groove is formed around the circumference and poured with a watering can, a ladle from a bucket. The pit uses up to 1 bucket or 10 liters of water.
- After the final absorption, the trunk circle is mulched with compost, peat, dry grass without spikelets, covering material, and earth.
- The twigs are shortened to a height of 10 to 20 cm with 2-3 buds on each shoot.The question is, why shorten healthy shoots, if cute leaves have already hatched on them? And so that the gooseberry can take root first. An undeveloped root system will not be able to "feed" long shoots with a large number of buds, so the plant will grow frail. But the shortened branches in the second year will actively grow, forming strong fruits (branches on which berries grow). If 5–6-year-old bushes are transplanted, the pruning is carried out seriously - only a part of the 1–2-year-old shoots are left, which are shortened by half.
Gooseberry planting date
Despite the fact that it is customary to plant gooseberries in the fall, you can do this also in the spring and even in the summer - after all, it does not always happen to get the desired seedlings on time. Depending on the season, the landing will have its own nuances.
Photo gallery: types of landings
-
- Transshipment is the most gentle landing method
-

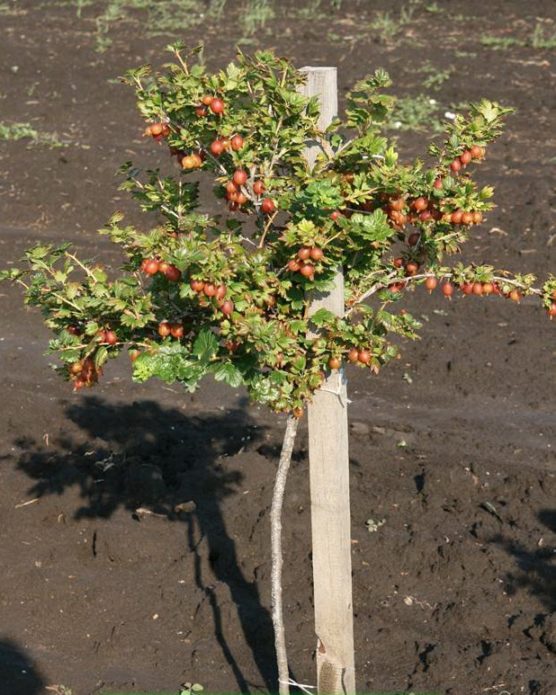
- Standard varieties are vulnerable to wind and need support
-

- Spring planting of cuttings

Autumn planting
In autumn, the most successful plantings of gooseberries are carried out, on the basis of the "life program" of plants in spring and summer, to gain strength and bear fruit, and in autumn to increase the root mass. Plantings are suitable for areas with warm autumn and moderately cold to severe but snowy winters. But the most attractive thing is that in the spring you get a viable fruiting bush (if the seedlings were two years old).
In the northern regions, work begins at the end of August, closer to the middle lane - from mid-September to mid-October. Mild autumn days are ideal for the development of overgrowing roots, which are responsible for feeding the ground part of the plant. Before the first frost, the seedling has time to take root, during the winter the earth settles and becomes denser.
Landing dates by region
In the northern regions - in the Urals and Siberia, gooseberries are planted in early September, but unfavorable weather conditions can shift this period to the end of August. In Crimea, Kuban and southern Ukraine, planting operations are carried out from mid-October to half of November. For the northern and central regions of Ukraine, the beginning of October will be a favorable time, in the Russian Non-Black Earth Region - the second half of October, in the Moscow Region - from mid-September to mid-October.
Planting gooseberries in spring
In the spring, as a rule, they plant everything that was late to plant in the fall. It is important to catch a favorable moment when the buds are asleep, but the ground has already thawed (do not forget, the gooseberry growing season is one of the first). Global climate change has completely shattered the inconstancy of spring weather - return frosts come when you don't expect them at all, and the summer heat can strike in one day. So, if you are late with planting, an unrooted seedling can die from weather stresses, and once it gets out, it will most likely be rickety and will come into fruiting later than the appointed time.
It is natural to plant semi-lignified gooseberry cuttings harvested in autumn in the spring. Cuttings 20 cm long are planted on beds fertilized since autumn at a distance of 15–20 cm from each other. Work is carried out as soon as the ground thaws and becomes pliable for loosening. Cuttings are placed at an angle of 450 for better rooting, the earth is tamped and mulched with a layer of peat or humus 5–6 cm thick. It doesn't matter if it freezes again or snow falls. After significant warming, the ground in the garden bed is loosened, the bare cuttings are gently pressed into the ground to the desired depth. Further care consists in watering, feeding, loosening and weeding.
Planting gooseberries in summer
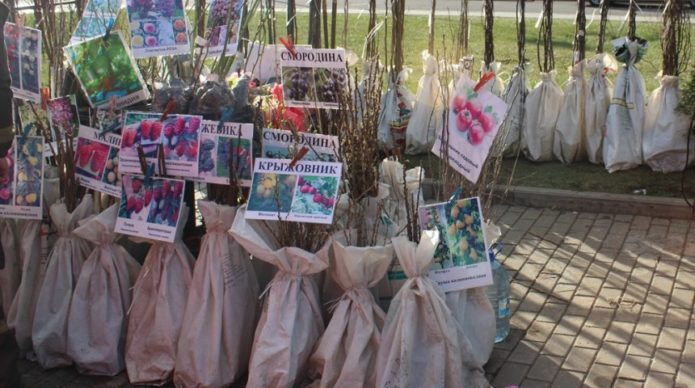
Relatively recently, the sale of gooseberry seedlings in containers began to gain momentum - a cellophane tube, by itself or placed in a cardboard box with a picture on it. On the one hand, you seem to buy a pig in a poke, on the other hand, packaged seedlings are the only ones that will survive the summer planting in the garden.It will probably not even be a planting, but a transshipment, in which the plants do not experience stress, but simply continue to grow.
Photo gallery: packaged seedling
-

- A responsible manufacturer leaves all information about himself on the container
-
- Ideal "two years"

-
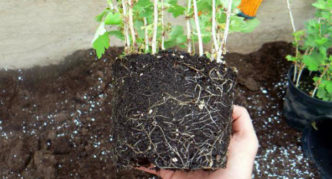
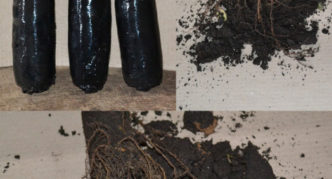
- The roots in the container shine with health
A certain share of the risk when buying a gooseberry in a box is that you can fall for a fake or a negligent seller who stored seedlings incorrectly. And, if no one is insured against fakes, then by purchasing a container in a store, you can check it. If the earthen lump is easily removed from it, it means that the gooseberry was planted recently, has undeveloped roots and will not survive the summer planting. And the low cost of such a seedling should also alert.
If the earthen lump is dry, it is immersed in water, which is absorbed into the ground through perforations. Roots that have grown through these holes are not removed (except for damaged ones).
Planting gooseberries in a box does not differ significantly from the usual:
- The polyethylene shell of the container is cut from the side and bottom.
- Take out the earthen lump carefully so as not to destroy it.
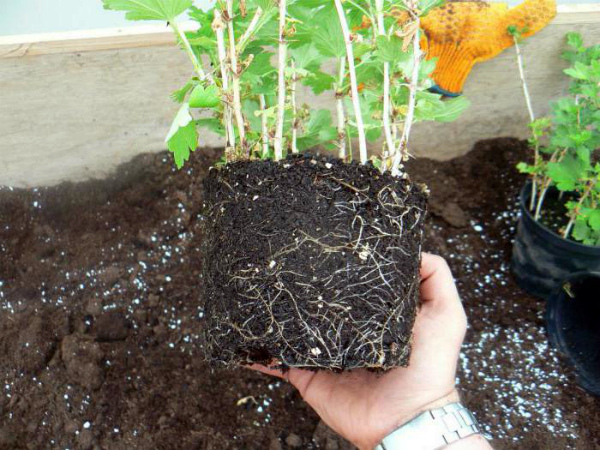
- If small roots are packed, run your fingers along the coma, "ruffling" them.
- A seedling is lowered into the finished planting hole and covered, watered, compacted and mulched the earth in the usual manner.
And a little about the nuances of planting from a container:
- When filling the hole with earth, the seedling is not shaken - during its stay in the container, the roots have come into full contact with the ground.
- The root collar is not buried.
- They are planted in open ground after July 1, and in some regions later, when the threat of return frost has completely passed.
Caring for planted gooseberries
Weeding, loosening and watering are carried out within the radius of the crown, because the roots of the gooseberry do not "go" far beyond the edges of the shoots. They loosen the ground to a depth of about 4 cm so as not to break the thin growing roots, most of which are closer to the surface (5 cm). In normal weather, seedlings will need 3-5 waterings per season, depending on the vagaries of the weather, the number of waterings is adjusted.
If a variety with a spreading crown, in the future it will require a garter or props - this will keep the aisles free, and the harvest clean, because the branches, burdened with an abundance of berries, lean to the ground and get dirty.
Root shoots are removed if reproduction is not planned. Sanitary, thinning and forming (for standard varieties) pruning is carried out in the fall. On boles, shoots are removed from the stock. Dry, diseased and gnarled branches are removed to the very ground.
From the second year, the soil is cultivated around the bushes, especially if manure was not used during planting: 25-30 g of ammonium nitrate per 1m2 is added for digging2... In the future, 60–80 g of ammonium nitrate is added annually to each bush, every 2 years, 60–100 g of superphosphate, 40–50 g of potassium chloride.
After harvesting, preventive spraying of the bushes with fungicides is carried out; in the fall, diseased branches and fallen leaves are scooped out from under the bushes, where pests can hibernate, and burn them. In order for the plant to winter comfortably, fertilizing is carried out in the fall (for this there are "thematic" fertilizers - Sotka Autumn, Autumn, Bona Forte in autumn) and water-charging irrigation followed by mulching.
How to save planting material before disembarkation
There are many objective reasons that make it difficult to plant seedlings in open ground on time: the postal parcel arrived at the wrong time, they were looking for the right variety for a long time, or it was bought at an agricultural fair that took place too early, or even the weather is colossal. The forced stay of a seedling in the house can last for several months.
For a short time (several hours or days), the gooseberries are overexposed in a container with water, immersing the roots in it to the level of the root collar.
It is convenient to keep planting material in a house or apartment:
- In the refrigerator - for this:
- put one in one several plastic bags;
- dress on the roots;
- a special substrate for seedlings is poured inside, shaking the bag to avoid voids between the roots;
- moisturize the contents of the package;
- the upper part is tied at the root collar, several ventilation punctures are made on the lower part;
- put the container in the vegetable compartment; packed seedlings are stored unassembled, but covering the shoots with damp paper or rag; regular inspection for the appearance of mold;
- On a glazed cold balcony, loggia, veranda at a temperature of + 2–3 oC and diffused lighting, planted in a pot (bucket, box). This method cannot be called the best, because the buds will start to grow, but planting will not be traumatic if the plant can be carefully transferred into the planting pit. To prevent the seedling from being exhausted, the shoots are cut off, leaving 3 buds each. It remains to monitor the moisture content of the earthen coma and the absence of pests such as thrips.
Seedlings purchased in the fall can be stored until spring, despite temperature fluctuations:
- under the snow, if the layer thickness is at least 15 cm:
- seedlings are immersed in water for 3-5 hours;
- remove (break off or cut off) the leaves;
- dig a hole in the snow, a trench along the length of the seedlings;
- a wide wooden plank, spruce branches are placed on the bottom;
- the prepared seedlings are laid with shoots on a bar (or entirely on spruce branches);
- the roots are sprinkled with a layer of dry peat or earth;
- from above, the plants are completely covered with spruce branches, burlap or spunbond;
- covered with snow with a slide;
- a layer of sawdust 8–10 cm thick is poured on top (you can go beyond the boundaries of this area), which will not allow the snow cover to melt prematurely;
- the shelter is indicated by milestones (poles);
- in a prikop - this is how they save seedlings if the snow cover is small or the winter is snowless:
- leaves are removed from the shoots;
- find a shaded dry place protected from the wind, if there is none, dig a shallow trench;
- the seedlings are laid, the roots and part of the shoots are covered with an earthen layer 20-30 cm thick;
- the planting material is covered with spruce branches, spunbond, to retain moisture.
Video: autumn planting of gooseberries
The success of the planting event lies in the correct timing, specific to different regions. With forced long-term storage, gooseberry seedlings retain their viability from autumn to spring.