Many methods of grape propagation have long been known. Planting with cuttings, or shanks, is the most common of them. This process is simple, but it requires a lot of time and knowledge. This article provides all aspects of planting grapes with shanks, which will be clear even to beginners.
Content
When is it better to plant grapes by cuttings
The timing of grape propagation largely determines the effectiveness of planting. So, you can find information that this procedure can be carried out both in spring and autumn. However, the experience of winegrowers shows that cuttings often freeze during autumn planting. Even measures to protect them from frost do not save them. Hence, spring planting is always more efficient and less labor intensive.
The specific term for grape cuttings in the spring depends on the climatic conditions of the growing region. The optimal period is the time when the soil temperature at a depth of 25-30 centimeters reaches 8-10 degrees Celsius:
- in the southern regions - late March - mid-April;
- in the central regions - early April - early May;
- in the northern regions - the last days of April - the end of May.
When planting grape shanks in open ground, be guided not only by calendar dates, but also by weather conditions outside the window - the soil must be sufficiently warmed up
If you nevertheless decide to plant cuttings in open ground in the fall, you should remember that this is strongly discouraged in the northern regions. In other territories, this procedure is carried out two weeks before the onset of frost: in the southern regions - at the end of October, in the central regions - in mid-October. The optimum air temperature will be no higher than + 15 ° C and not lower than + 5 ° C.
It should be remembered that cuttings planted in the fall require additional frost protection. Most often it is done like this:
- When planting, an earthen hill up to 30 cm high is poured over the hole.
- Cover the cuttings with plastic wrap or cover with a cut plastic bottle with three holes.
In addition to the traditional methods of propagating grapes, even grape seeds can be used for this purpose, although this is associated with great trouble and is considered a risky business:https://flowers.desigusxpro.com/en/yagody/vinograd/kak-razmnozhit-vinograd.html
Procurement and storage of planting material
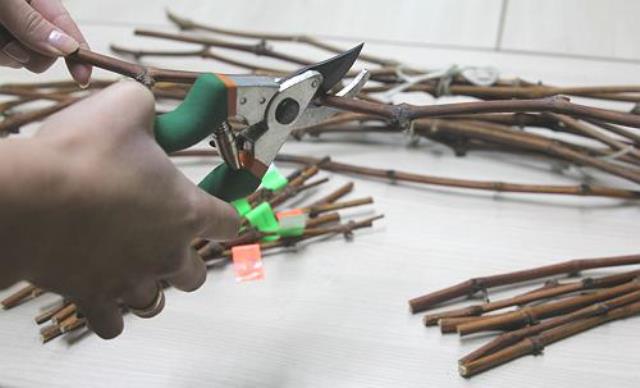
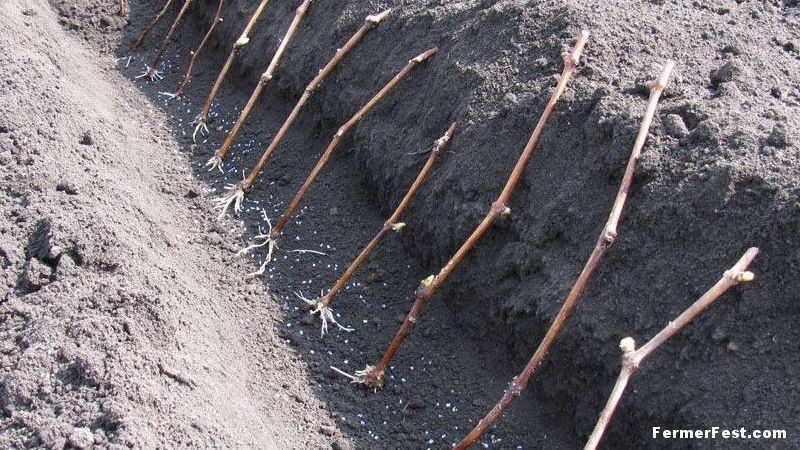
Cuttings (shanks) are pieces of a one-year-old fruiting vine. They can be purchased on the market, in specialized nurseries, or, if possible, prepared yourself. In the first case, there is a risk of being deceived by unscrupulous sellers and buying grapes of the wrong variety or spoiled as a result of improper storage of the cuttings (the method of checking the suitability of the cuttings for planting will be described below).
Chubuki are harvested at the time of autumn pruning of grapes - after leaf fall before the first frost. Spring is not suitable for this process, since the development of shoots does not occur during hibernation.
In the southern regions, the leaves from a grape plant do not always have time to crumble before the onset of frost. Therefore, cuttings can be harvested earlier than this time. You just need to make sure that the vine is ripe. This period begins approximately in the second half of October - early November.
The tool used to cut the twigs (knife or pruner) must be sterile so as not to infect the plant
As a donor, a one-year, well-ripened, even, disease-free vine that does not have mechanical damage on the surface is selected. Cuttings are cut from its lower and middle parts. Branch diameter from 6 to 12 mm (the grape variety must be taken into account). The length of the twig can vary from 20 to 50 cm, the main thing is that there should be at least 2-3 developed buds on the handle.
From below, the stalk is cut off 1 cm before the bud; from above, the stem should recede from the bud by about 2 cm.
Long cuttings are considered to give the best propagation results. And experienced growers note that longer cuttings, for example, with 6 buds, are even easier to keep until spring (they are cut in half before planting).
1% iodine solution will help to assess the maturity of the vine. It is necessary to analyze how the color of the cut on the vine will change when immersed in iodine: a light green color will indicate that the vine is not ripe; violet-black shade - about the full ripening of the branch.
Sliced shafts are formed into bundles marked with the name of the variety, wrapped in a plastic bag and sent for storage. The main task of the storage process is to prevent the cuttings from waking up and growing earlier than the desired time. Therefore, they should winter in a dark cool place at temperatures from 0 to +50C. For storage space, you can choose:
- refrigerator (suitable if there are few cuttings);
- cellar or basement;
- a pit under the ground 25–30 cm deep (in this case, the bundles are shifted with straw and covered with soil).
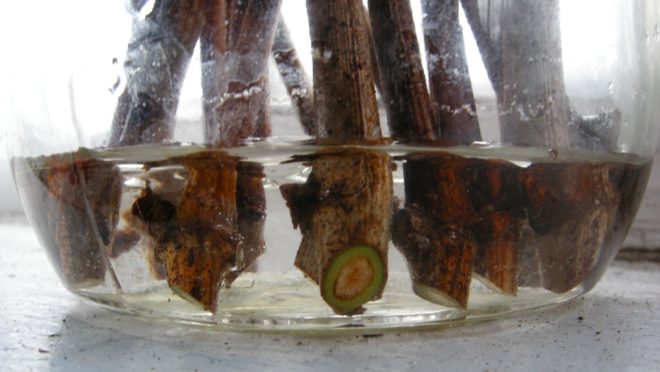
Experts recommend soaking freshly cut cuttings in water for 24 hours so that they absorb the necessary moisture before storing.
Several times a month it is advisable to revise the cuttings for mold and rot. It is better to throw away rotten specimens immediately. And twigs with signs of mold can be washed in a solution of potassium permanganate, dried and returned to storage.
Video: harvesting and storing grape cuttings
Planting grapes with cuttings in the classic way
Planting shafts in the ground is a simple procedure, but time consuming, which includes several stages:
- Awakening and rooting of cuttings.
- Organization of a landing pit.
- The very process of planting the shanks in the ground.
- Top dressing of young seedlings.
- Watering after planting.
Each of these stages has a number of features and requires the implementation of certain rules.
By grafting your favorite grape varieties, you can quickly and inexpensively update your vineyard:https://flowers.desigusxpro.com/en/yagody/vinograd/kak-razmnozhit-vinograd-cherenkami.html
Preparing cuttings for planting
This process begins in late winter or early March, depending on the expected time of planting in open ground and involves removing the cuttings from dormancy and rooting them. The preparation of the shanks for planting increases the survival rate and allows active growth to begin earlier.
Preparing the shanks for planting includes several phases:
- Assessment of the suitability of cuttings for planting: make a small incision in the bud (it should be greenish) and a cut on the twig (the vine should not be dry and green). All shanks that do not meet these parameters are not suitable for landing.
- Washing the selected twigs in a weak solution of potassium permanganate (in order to eliminate bacteria).
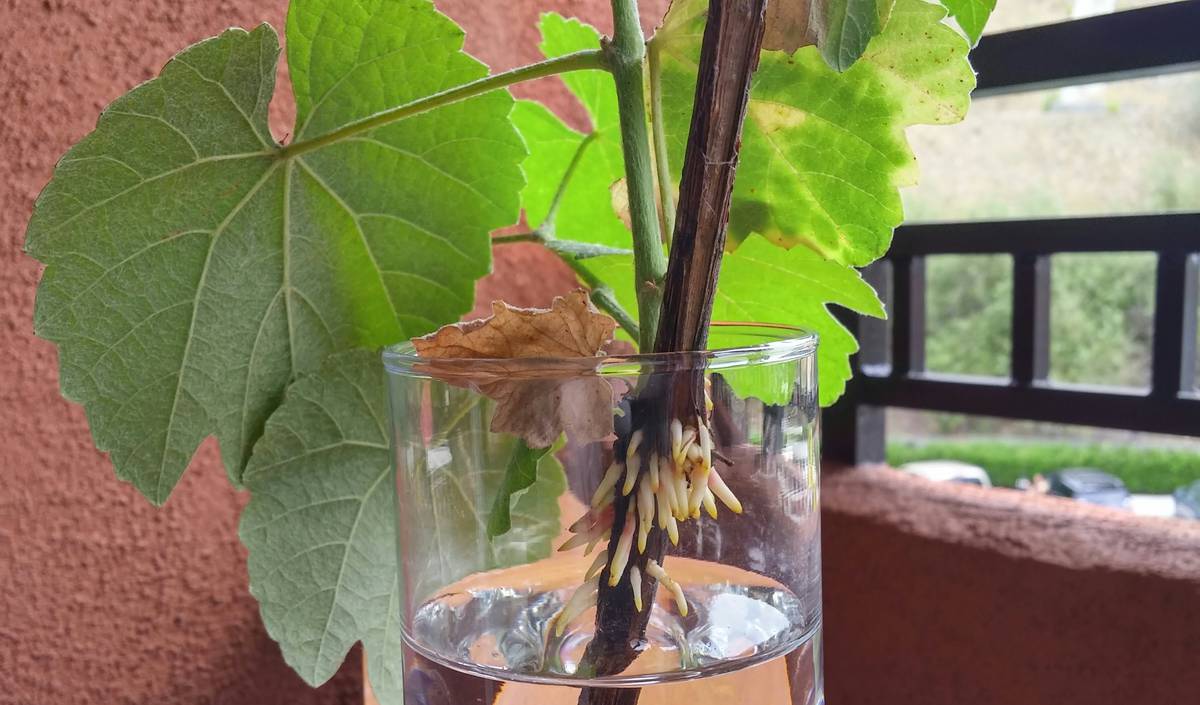
- Placing cuttings in settled or melted water for 1-2 days (water should cover more than a third of the length).
Heat and moisture bring cuttings out of their natural winter sleep
- Treatment of cuttings with root stimulants according to the instructions (Kornevin, Heteroauxin, sodium humate, aloe juice, honey).
- To accelerate the formation of roots in the lower part of the shank, 3-4 small longitudinal scratches are made with a sharp object (awl, nail, scissors).
- Germination of roots in a kilchevator. The upper part of the bottle is cut off, drainage holes are made in the bottom. Cuttings are placed. Next, the container is filled with wet sawdust, previously scalded with boiling water. Watering is carried out with warm water as the sawdust dries. The plant will give its first roots in about three weeks.
- Chubuki with healthy roots longer than 2 cm are ready for planting on the site.
The main principle of the kilchevator is based on the fact that the bottom of the shank needs to be heated, and the upper part should be kept in the cold so that it does not bloom before the roots appear.
Selection and preparation of a place for planting grapes
One of the prerequisites for high yields is choosing the right place for planting. Grapes are a thermophilic plant that does not tolerate stagnant water. Therefore, when determining the place of residence of this plant on the site, you need to focus on the climatic conditions of the region.
In the northern regions and the middle lane, it is necessary to provide the grapes with as much warmth as possible, so a spacious area is suitable, protected from the cold wind by trees and shrubs growing along the edges.
In areas with frequent summer rains, it is important to protect the grapes from excessive moisture and provide good ventilation. To do this, it is better to place the shrub on a slope or a loose mound.
It is not recommended to plant new vines in place of old ones for at least 2-3 years after the latter have been uprooted.
In arid regions, the plant must be provided with systematic watering or placed in a place with a close occurrence of groundwater (but not closer than 2.5 m from the surface). Mulching the soil with grass or covering it with a black film will also help preserve moisture.
On flat areas, the bushes are planted in the direction from north to south. It is believed that in this case the grapes will receive more sun. Shrub shading with tall trees should be avoided.
It is not recommended to plant grapes closer than 2–2.5 m from houses and other buildings, since intensive watering of the plant can undermine the foundation of the building. The southern wall of the house is ideal.
The southern wall of the building is ideal for growing grapes
Grapes do not tolerate being close to walnuts. Many other plants also affect its life:
- harmful neighbors: dandelion, wormwood, wheatgrass, plantain, bindweed, nightshade, yarrow, wormwood, nettle, clematis, cornflower, as well as lawn grass, horseradish, corn, tomato, sunflower, cut onion, lettuce;
- useful neighbors: sorrel, carrots, peas, cabbage, cauliflower, radish, beetroot, melon, radish, strawberry, cucumber, dill, beans, onions.
Havea plot for planting is prepared in advance: it is leveled and cleaned of old trees and shrubs. Grapes do not like very acidic and alkaline soils, so you should take care of its structure. Planting and embedding green manures (mainly legumes), which are carried out a year before the proposed planting of grapes, will help to enrich the soil.
The planting hole must be prepared at least 2 months before planting: dig up and fertilize.
Video: the perfect place to plant grapes
Scheme and depth of planting grapes
Recommended planting pit size and depth depends on soil type:
- on black soil - 60x60x60 cm;
- on loam - 80x80x80 cm;
- on the sand 100x100x100 cm.

Recommended planting scheme for grape cuttings
For sprouted shanks, the following is used grape planting scheme in the pits:
- Fertilizers are placed at the bottom of the pit with a layer of 20-30 cm (1 level) and lightly tamped (the composition and proportions are described below).
- Set the seedling as shown in the figure: the upper eye is 5 cm below ground level.
- Fall asleep with earth at level 2 and slightly trample.
- Pour 40-50 liters of water.
- After the water has been absorbed, the pit is filled with earth without compaction and moisture to level 3.
- When planting in the fall, they form a mound, and in the spring they leave a small hole (15–20 cm).
In parallel, support should be organized for each bush. Once planting is complete, protect the plants from direct sunlight for the first two weeks..
When planning the placement of a large number of bushes, it is necessary to choose the right distance between bushes in a row. It will depend on several factors:
- trellis type;
- the presence of drip irrigation;
- soil fertility;
- characteristics of a particular grape variety.
Most often, growers use 2 types of vertical trellis: one-plane and two-plane. It is believed that the second allows you to significantly reduce the distance between seedlings in a row without harming their life.
It is believed that grapes growing on poor soils without drip irrigation will have weak and thin vines. For this reason, bushes can be planted much thicker than on fertile land with regular watering.
Recommended spacing between bushes in a row, depending on the variety:
- for the tall ones - at least 3–3.5 m;
- for medium height - 3 m;
- for the weak - 2.5 m.
The row spacing should allow for ventilation of bushes, free passage for chemical treatments, as well as minimal shading of adjacent trellises by previous ones. The optimum is 2.5–3 m.
Video: a proven method of planting grapes
Fertilizers applied at planting
For normal development, a young seedling needs feeding. For the first time, fertilizers are applied directly to the planting pits. As a rule, organic fertilizers in the form of humus are used for the initial nutrition of grapes. Its advantage lies in the fact that nutrients are released from it gradually, over about three years. However, there is an opinion that humus provides a small excess of nitrogen supply, therefore it is recommended to add phosphorus (superphosphate) and potassium fertilizers (for example, wood ash).
When planting grapes with cuttings in the fall, make sure that the humus is sufficiently rotted. Otherwise, it will begin to decompose and generate heat, which will warm the roots of the seedling and cause the buds to awaken.Such a bush will die in winter.
Fertilizers are applied to a planting pit 80x80x80 cm in the following proportions:
- humus - about 7 buckets;
- superphosphate - about 1 cup;
- wood ash - 300 g (1-2 liter cans).
Humus and superphosphate are mixed and dug into the clay at the bottom of the pit. The ash is buried in the soil around the seedling, and does not mix with humus.
Watering after planting
For young grapes, watering is vital, since undeveloped roots are not yet able to provide the plant with a water supply. At the time of landing, 40-50 liters of warm water are poured into the pit. Subsequently, irrigation is carried out about three times a week, and then reduced to once every 7-10 days until the end of summer (at least 30-50 liters per hole). Watering is not carried out during precipitation. After each moistening, the soil needs loosening to improve its aeration.
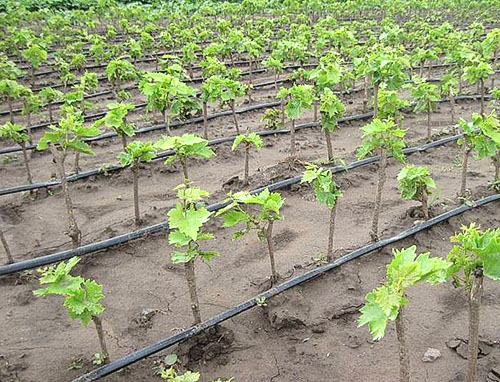
Drip irrigation provides young seedlings with ideal conditions for development
Planting by cuttings without roots
You can plant grapes in the spring with unrooted cuttings. However, in this case, the probability of survival is reduced. The plant will grow much slower in the open field than when planting germinated cuttings. Leaf formation will occur later, as the plant takes time to form a root system.

Grape shanks do not need to be rooted and planted in open ground in spring after preparatory measures
Planting with stems without roots is possible only if the following conditions are met:
- warm weather is established without the risk of frost;
- harvested twigs have a thickness of at least 8–10 mm;
- cuttings are pre-prepared for planting (according to the technology described above without germination in a kilchivator).
Planting grape cuttings without roots is carried out, as a rule, in the classical way in planting pits. For greater confidence, it is recommended to plant two cuttings in each hole. If both take root, then the weaker one must be removed or carefully dug up and transplanted. It is often practiced to plant unrooted shanks in a school or on a garden bed, with their subsequent resettlement to a permanent place after the formation of the root system.
For the successful cultivation of grapes in summer cottages, several factors must be taken into account that determine the success of this undertaking:https://flowers.desigusxpro.com/en/yagody/vinograd/vinograd-na-dache.html
Unconventional ways of planting grapes by cuttings
The desire to get a rich harvest in a shorter time makes gardeners experiment and use different grape planting techniques, different from the traditional described. Let's consider the most common ones.
Planting in glasses, containers and bottles
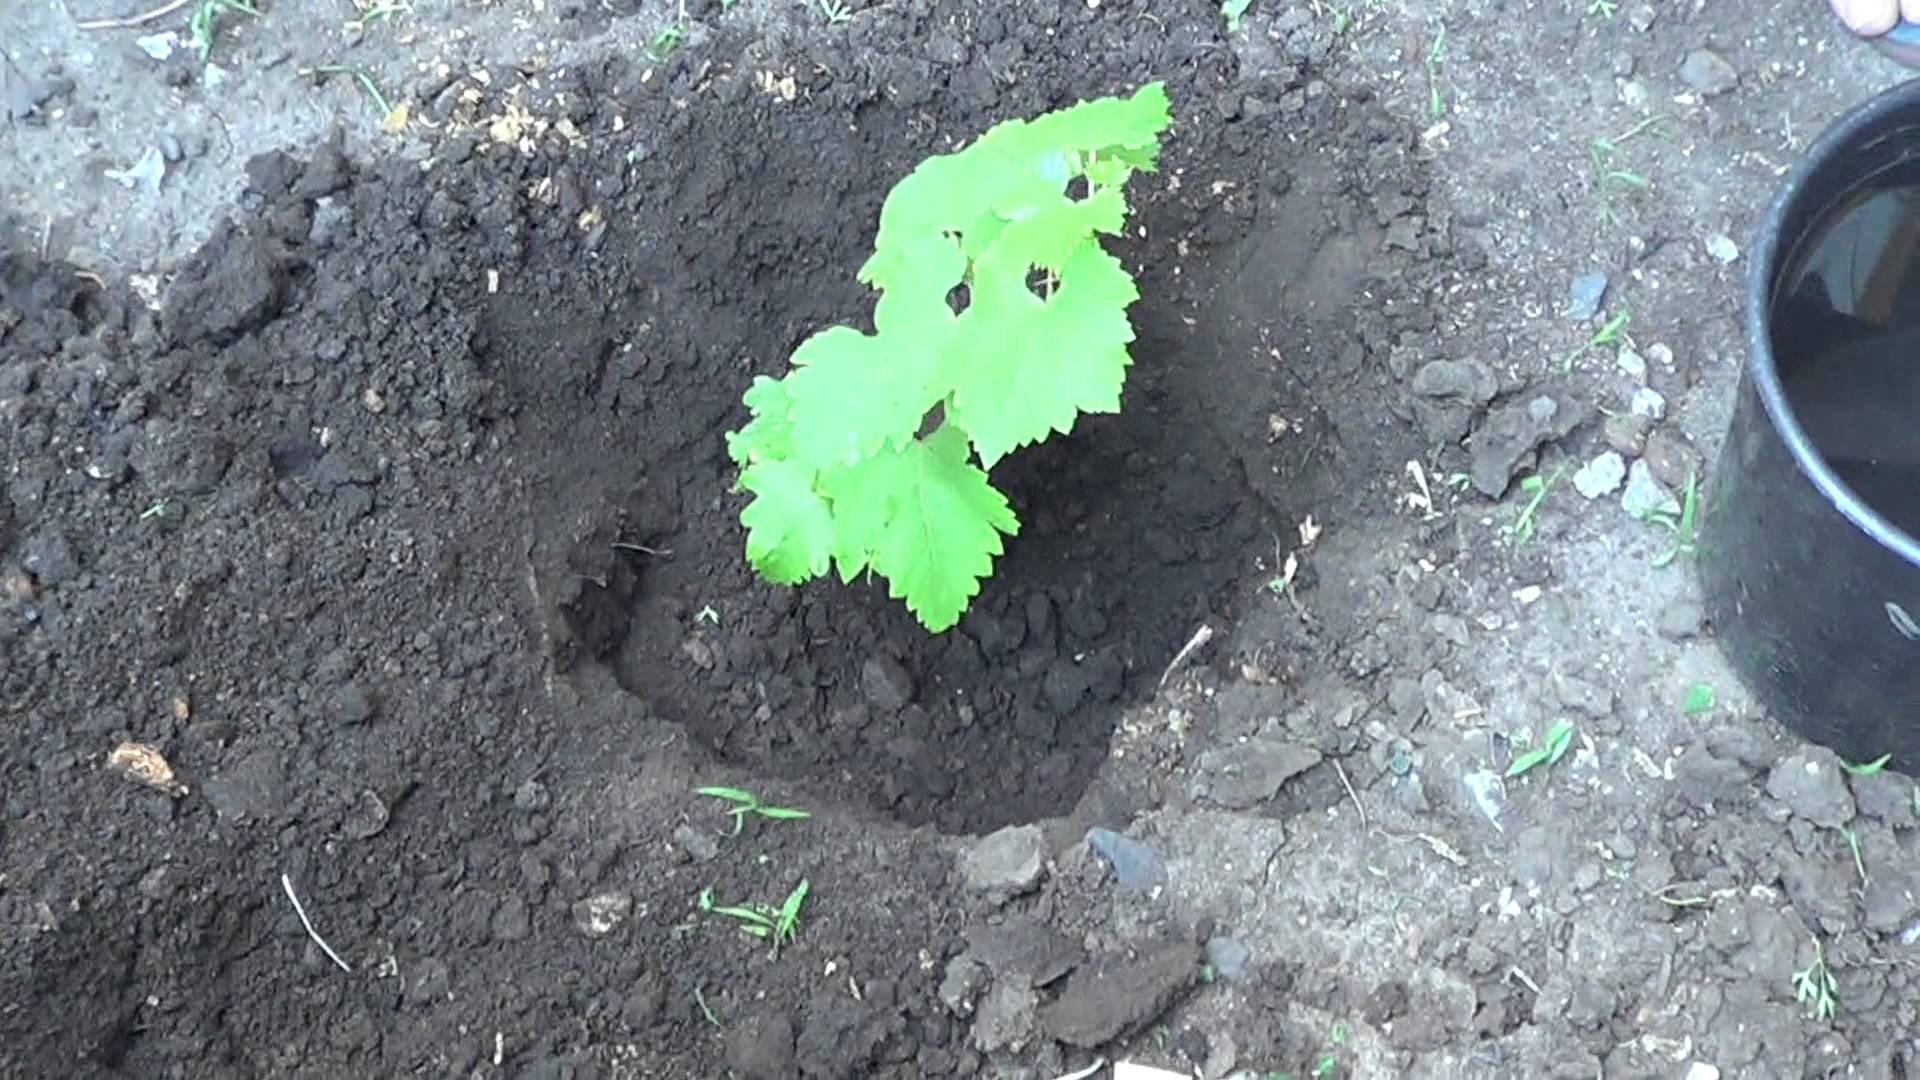
After preparing the cuttings in a kilchevator, many gardeners plant them in the soil for germination and obtaining a real seedling. The container for this can be plastic cups, bags, containers or cut plastic bottles, which are filled with a mixture of garden soil, sand and humus (3: 1: 1). Chubuki are placed on the soil, carefully covered with the rest of the soil mixture and watered. It is important that the improvised pots have drainage holes to remove excess moisture.
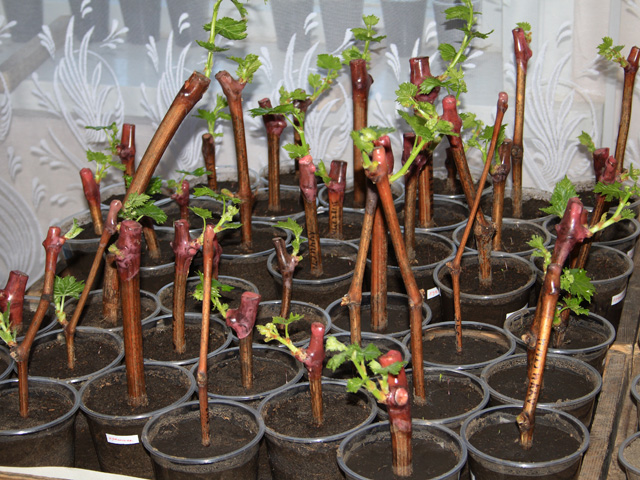
Germination of shanks in the soil allows you to grow a full-fledged grape seedling
With the onset of heat, a hardening procedure is carried out, that is, the container with seedlings is taken out into the fresh air for several hours a day, gradually increasing the duration of walks.The need for this event is justified by the fact that young plants are very sensitive to temperature changes, and hardening prepares them for life in the open field.
This method is used for growing grapes of late varieties, as it allows you to accelerate the ripening of the fruit.
Video: planting grape cuttings in cups
Video: planting grape cuttings in a bottle
Planting in the beds
To obtain healthy grape seedlings from the shanks, they are often planted on a temporary bed (shkolka). With this method of planting, seedlings grow with a powerful root system with several strong shoots. This is due to the fact that the roots of plants are all the time in a sufficiently warmed up upper layer of the soil with good air access.
Growing seedlings in a school requires mandatory feeding of plants, frequent watering and loosening of the soil, persistent weed control, shading in too hot weather
Planting cuttings in the school is completed no later than the first decade of May. In this case, seedlings grow in the garden until mid-autumn, and then they are dug up and sorted. Those seedlings that have a growth of shoots of more than 30 cm and at least 3-4 sufficiently developed roots are considered to be qualitative, the rest are discarded.
You can plant them in a permanent place right away, or you can postpone the planting until spring, providing the right conditions for storing seedlings (the same as when storing chubuki).
To plant the shanks on a temporary bed, you must:
- Dig grooves 40 cm deep and shovel wide.
- Set the cuttings along one of the groove walls at a distance of 12-15 cm from each other and so that 1-2 eyes of the cuttings remain above the soil surface.
- Fill the groove with soil up to half, tamp it tightly with your foot or a rammer, pour plenty of water and, after it is absorbed into the soil, completely fill the ditch.
- From above, make an earthen roller of loose earth 10-12 cm high above the upper bud.
- Immediately after planting the cuttings, loosen the soil again.
Video: planting grape cuttings in a school
Planting in a greenhouse
Recently, the greenhouse method of growing grapes has been practiced not only in cold regions. This is explained by the fact that planting in a greenhouse has its own advantages:
- microclimate favorable for plant development;
- protection against frost and temperature extremes;
- acceleration of fruiting by at least half a month.
In the greenhouse, you should not grow varieties with dense clusters - due to poor ventilation, they are often affected by fungal diseases.
Before planting in a greenhouse, cuttings must be germinated and rooted in special containers, growing seedlings from them. At the same time, the preparation and cultivation of cuttings begins in mid-January, in order to continue growing seedlings in a container with soil in a month.
Video: growing grapes in a greenhouse from 0
Hill landing
This method of planting is often practiced in the middle lane and northern regions, where it is necessary to improve the heating of the soil and accelerate the beginning of the plant's growing season. Landing in a hill also solves the problem of close groundwater.
To plant grapes in this way, you should:
- Dig a hole about 50 cm deep, 60 to 80 cm in diameter.
- Place drainage (pebbles, broken brick, gravel) on the bottom.
- Fill it with fertile soil (your land mixed with humus, sand, peat). It should be noted that the soil must be tamped (poured 20 cm - tamped).
- In the center, drive in a peg to which you need to tie the stalk rooted in advance.
- Fill in a small hill of earth with gentle slopes about 20–30 cm high, leaving only the upper peephole.
- Cover the bud with grass and organic mulch.
It is better to place the stalk at a slight slope to facilitate the process of hiding it for the winter.
Video: planting a garden on a hill
Landing along buildings and fences
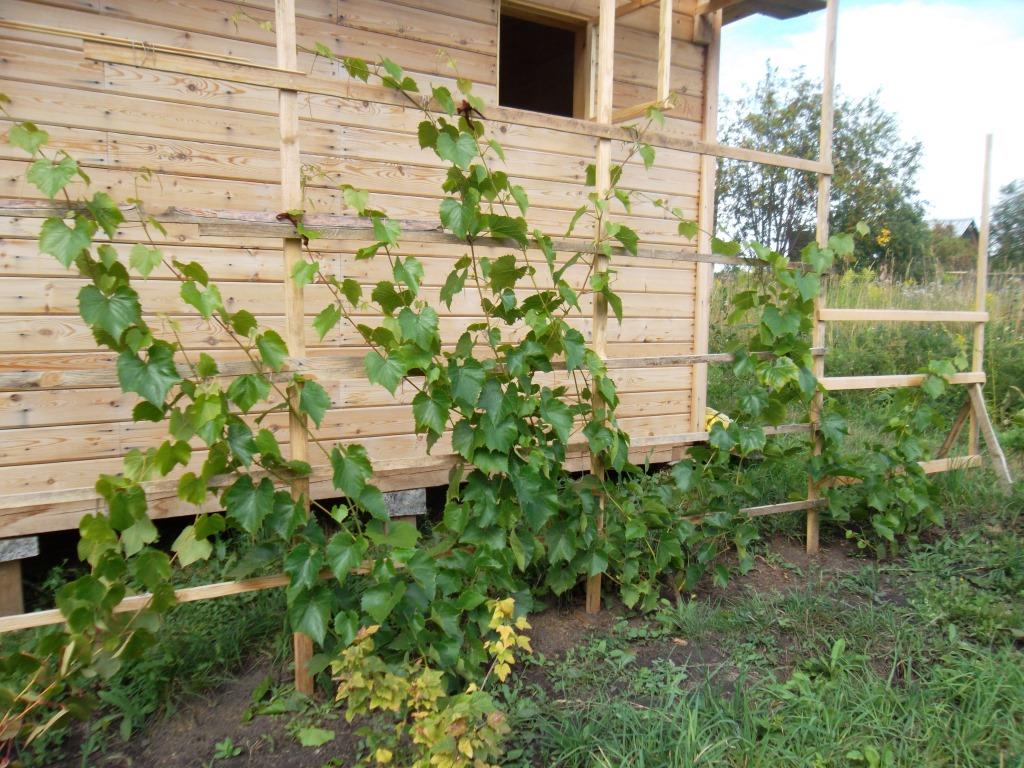
Grapes are often planted along various structures. The main reason for this decision is that during the day the walls warm up, and at night they give their warmth to the grapes growing nearby. This effect allows you to accelerate the ripening of berries by 5-10 days. You cannot place plantings close to the wall, since its surface will not be able to warm up and the desired result will not be achieved. In addition, the very close proximity of grapes has a negative impact on the foundation and the condition of the walls of the building.
Moldavian planting
A variety of cuttings is planting grapes in the old Moldavian way (kalachik).
The method consists in the fact that the planting is carried out using not a short cutting, but a large part of the vine, 60 cm to 2 m long. The principle of selection and harvesting of the vine in autumn is the same as for the shanks. Planting in this way is carried out in the spring.
The Moldavian planting method involves the following steps:
- The vine is twisted into a ring of 1-2 turns and tied with a rope.
- It is soaked in a barrel of water for 2-3 days.
- All the lower eyes are removed, only 2-3 buds are left at the upper end of the vine.
- The resulting circle is placed in a hole 70–75 cm deep and 80 cm in diameter so that the remaining buds are placed on the surface.
- The pit is filled up to half with earth, trampled down and watered abundantly.
- When the water is absorbed, the pit is completely filled with soil.
- So that the buds do not dry out, they are sprinkled with earth or mulch.
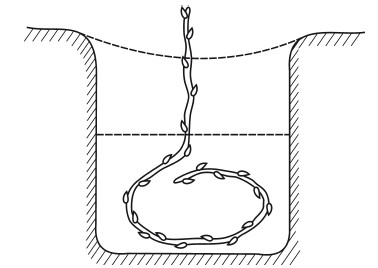
With this method, rooting occurs along the entire length of the vine.
A rich supply of nutrients contained in the wood of the vine will allow the rapid development of a powerful root system along the entire length of such a cutting and will provide food for the first shoots.
One of the disadvantages of planting grapes in a ball is the need for a large amount of planting material.
This technique is not suitable for planting vineyards in large areas using machines, but for amateur viticulture it is quite acceptable.
Reviews of the Moldovan method of planting grapes
The operation is performed without kilchevaya. Take a well-ripened shoot and in the spring, after soaking it, plant it with a ring. All eyes, except for the two upper ones, are blinded. There is a lot of wood (and therefore nutrients). The survival rate is almost complete. The first year there is a strong growth, you can do accelerated formation.
This method is popularly called the Kuban planting method. There is a drawback: it takes a lot of vines to plant. But in terms of development power, such a bush in the third year will look much more powerful than even its own rooted peer. I checked this from personal experience. When they ask me for saplings from Moldova, I suggest asking the neighbors for a vine and planting in this way. It is not profitable for me to grow Moldova with seedlings, and therefore I advise.
This year, I planted in this way, some kind of old variety, we always called it a lady's finger, planted it just for the sake of experiment, so the result is almost as good as the purchased seedlings planted, the vine is about one and a half meters. Moreover, I planted it simply by digging a hole so that the vine could climb, without fertilizers. So I think you can try.
Planting girlish grapes with cuttings
The maiden grape (or parthenocissus) has inedible fruits, but is widely used by site owners for decorative purposes. The attractive appearance of the leaves, the ability to grow quickly, as well as the unpretentiousness and resistance to diseases make the girlish grapes an excellent option for creating a hedge.

The maiden grape opens up its lush leaves at the end of May and pleases the eye until late autumn
Parthenocissus is easy to propagate by cuttings. Moreover, this can be done throughout the season, from early spring to mid-autumn.
If reproduction is carried out in spring or early summer, then the shanks are cut from annual lignified shoots. The optimal length of the cutting is 20–30 cm. The main thing is that there are 2–4 living buds on it.
If cutting is carried out in the middle of summer, then hammer-shaped cuttings are harvested: a small piece of last year's vine with one bud is cut out, from which a lateral shoot has already grown. If the kidneys are very close, then 2-3 nodes can be left.
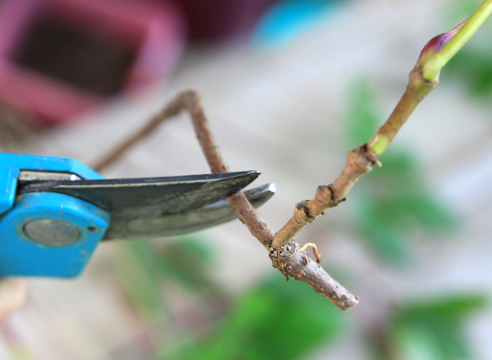
Cuttings that are harvested in summer are hammer-shaped and consist of a piece of last year's vine with a knot and a young shoot
The shanks are planted in the ground immediately after harvesting. If this is not possible, then they will calmly wait for this procedure in a container of water. At the same time, the parthenocissus has almost 100% survival rate, so there is no need to process the planting material with root formation stimulants.
Note that while in the water, the cuttings of the maiden grapes take root easily. But after planting in the soil, these roots die off, being replaced by permanent ones. So rooting a parthenocissus in water is a waste of time.
There are several options for planting girlish grapes with cuttings:
- Rooting immediately in a permanent place: a small depression of 15 cm is dug, at the bottom of which drainage is laid. The stalk is lowered into the hole at an angle. In spring cuttings, the lower bud is buried in the soil, and in summer cuttings, a piece of last year's wood. This method is used if it is possible to water and weed the entire planting area. In the early years, the plant actively grows its root system, so the aboveground part develops very slowly. Consequently, the seedlings will be lost among the weeds and may be accidentally trampled or cut down.
- Landing on a growing bed. The disadvantage is that when the time comes to transplant to a permanent place, the vines and roots of the seedlings will already be tightly woven and it will not be so easy to neatly untangle this ball.
- Rooting in individual containers (plastic cups, pots, containers). A mixture of peat and sand (3: 1) is used as a soil. Plant care consists in regular watering. You can plant seedlings in open ground next year. In winter, it is not necessary to bring containers into the room. It is enough to place them in a place protected from the cold wind and sprinkle with dry leaves.
Regardless of the type of planting, girlish grapes must be supported and shaded from the direct sun for the first time.
Video: growing, care and cuttings of maiden grapes
So, planting grapes with cuttings is a rather creative activity. After all, there are a lot of ways to harvest and prepare shanks for planting. Another choice concerns the technology of their planting in open ground. Whichever method you choose, it remains to believe that your efforts will be justified by a rich and generous harvest of amber grapes.